Despite a largely useless computer due to various hard drive failures (new one on its way), I wanted to do something special for this week’s parsha… except I like the hands-crossing Ephraim/Menashe activity so much, we’ll probably just do that again.
But then I remembered – this is not only parshas Vayechi, but it is also the last parsha in sefer Bereishis – which is totally worth celebrating!
This is a pop-up 3-d text project where the words Chazak, Chazak, v’Nischazek (חֲזַק חֲזַק וְנִתְחַזֵּק) can be coloured by the student, then jump out and make a delightful statement. Geesh; I know I’m WAY overtired when I use the word “delightful.” There’s also a song of Chazak, to the tune of Mary Had a Little Lamb (borrowed from Morah Morah Teach Me Torah – you can listen to the song here – search for “chazak” on the page). It, too, is delightful.
You can do this on a few different levels of complexity, depending on the age of your kids. For the very youngest kids, I’d just cut out the words as a whole. For older kids, you can cut out the insides of the letters, which I haven’t done here. Whatever you do, make sure you leave the top and bottom tabs attached to the letters when you cut them out. That’s what’ll make the whole project “pop”!
- To download this and hundreds of other Limudei Kodesh (Jewish) printables – including weekly parsha copywork and holiday resources, click here. (search for “chazak”)
- For General Studies printables, including science, art and music resources in Hebrew and English, Ambleside, composer and artist resources, click here.
Here are the basic steps to help you along:
0. Print the sheets on cardstock (except the page that says to use regular paper) and colour in the letter outlines and vowels.
 1. Cut out the word as a whole and FOLD IT right away on the crease lines, before you cut any more (if you are planning to cut more). Fold back and forth a bit; you want it to be nice & limber.
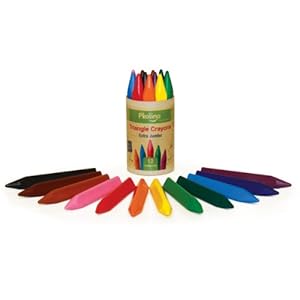
Aside: Didn’t I do a nice job colouring these??? Well, maybe not, but I do want to put in a plug for these crayons I bought last week, which are quite nice. My colouring doesn’t show it, but I have always disliked the bumpy texture you get when you colour with crayons, a texture which seems almost completely gone when I use these crayons, which are made in Europe by a company called P’kolino. The only thing is that they are billed as “Extra Jumbo.” Maybe that means something different in Europe, but to me, they feel a bit smaller than other triangular crayons we’ve used, including the Melissa & Doug Triangular Crayons (not my faves, but they have a nice case, feel very hard, and have lasted us a long time). End of shameless crayon plug!
2. Okay! Once the letters are cut out, apply glue to the very top tabs only.
3. Paste the word into its little folder. Placement may be a little fiddly the first time; practice on your own before involving kids, if at all possible. You want to be able to close the folder and a) have the words fold up nicely, and b) not have any part of the words sticking out when it’s closed.
4. When you’re satisfied with the top tabs, glue the bottom tabs only and paste to the “floor” of the folder.
5. Fold the card open and closed while the glue is still damp to ensure that the word is in a good position.
6. When all words are pasted into place, paste the two little folders into the bottom of the main folder. Paste the song lyrics on top, if desired, or use the blank Torah scrolls provided to create your own lyrics. Note: my lyrics say Bereishis only; due to a failing computer, I am NOT including lyrics for Shemos, Vayikra, etc., so if you want those, you’ll have to hand-write them or make up your own printable version.
Oh - I also hand-wrote transliterations on the top of each flap, but you could put whatever you wanted on there. I just don’t like seeing a blank surface. ;-)
Here’s what it looks like when you open up the folder:
7: Add the “Chazak” Torah scroll OR create your own image on the blank provided. I finished this by creating a fast wrap-around string closure because it’s a little bulky and pops open on its own otherwise. The circle the string wraps around is just 2 layers of the same pink cardstock glued together for extra rigidity. Notice I made an extra string-hole… whoops! (These are actually little notches, not holes; I just snipped a tiny triangle shape off the bottom and fed the string – really yarn – through the hole with a tiny crochet hook.)
… and done!
Leave a comment if you end up doing this; I’d love to see how it turns out!!!


Comments
Post a Comment
I love your comments!